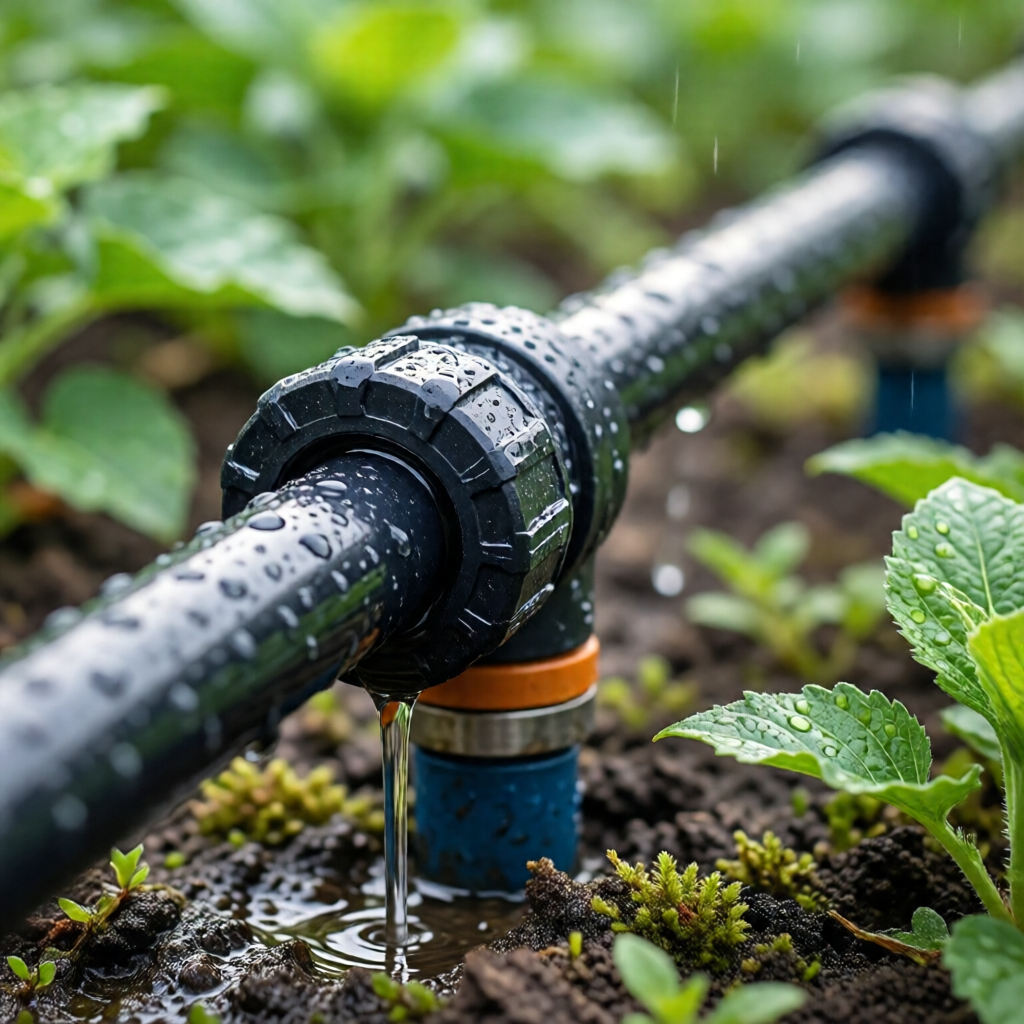
When it comes to keeping your garden thriving while conserving water and time, a DIY drip irrigation system is often the secret weapon seasoned gardeners swear by. Unlike sprinklers that waste moisture on foliage and sidewalks, drip irrigation delivers water directly to the root zone, ensuring each plant receives the exact amount it needs. In this guide, we’ll walk you through everything from planning and material selection to step‑by‑step installation and ongoing maintenance, all while sprinkling in expert tips, cost‑saving tricks, and environmentally friendly practices. Whether you’re tending a vegetable patch, a flower border, or a mixed‑use landscape, this comprehensive tutorial will empower you to design a custom drip system that fits your garden’s unique layout and your budget.
Why Choose Drip Irrigation for Your Garden?
Drip irrigation isn’t just a trend; it’s a proven method that offers several tangible benefits. First, it dramatically reduces water waste by delivering moisture directly to the soil, cutting evaporation losses by up to 70% compared to overhead watering. Second, it promotes healthier plant growth because the water reaches the roots without wetting the foliage, which helps prevent fungal diseases. Third, it saves you time—once installed, the system can be set on a timer, freeing you from daily watering chores. Finally, a well‑designed drip network can be scaled easily, making it perfect for expanding gardens or adding new planting beds in the future.

Planning Your DIY Drip Irrigation System
Assessing Your Garden’s Layout and Zones
Begin by sketching a rough map of your garden on graph paper or using a digital tool. Mark out existing plant groups, such as vegetable rows, perennial flower beds, shrubs like boxwood, and any raised beds. Group plants with similar water requirements into zones; for example, tomatoes and peppers need more frequent watering than lavender or ornamental grasses. Zoning allows you to customize flow rates and timer settings for each area, optimizing water use and plant health.
Calculating Water Requirements
Understanding how much water each zone needs is crucial for selecting the right emitter flow rates. A general rule of thumb is that most garden plants require about 1‑1.5 inches of water per week, which translates to roughly 0.62 gallons per square foot. Multiply the area of each zone by this figure to estimate weekly water volume, then divide by the number of watering sessions you plan to schedule. This calculation helps you choose emitters that deliver the correct amount per hour, preventing over‑ or under‑watering.
Mapping the Layout of Tubing and Emitters
With zones defined, plot the path of main supply lines (usually ½‑inch polyethylene tubing) and lateral lines that branch off to individual emitters. Keep the main line close to a water source, such as an outdoor faucet or rain barrel, and run it along the perimeter of each zone. Use T‑connectors to branch off into each bed, and install emitters at the base of each plant or at regular intervals for row crops. Planning the layout on paper first helps you avoid costly adjustments during installation.
Choosing Materials and Tools
Essential Components
A reliable DIY drip system needs a few core components: a pressure regulator (to keep water pressure below 30 PSI), a filter (to prevent clogging), a backflow preventer (to protect your water supply), tubing (main and micro‑tubing), emitters (drippers, inline emitters, or micro‑sprayers), connectors (T‑fittings, elbows, and end caps), and a timer (programmable or smart). Investing in quality parts up front reduces maintenance headaches later.
Optional Add‑Ons for Enhanced Performance
Consider adding a moisture sensor that pauses watering when the soil is already moist, further conserving water. For gardeners who love to grow roses, integrating a dedicated emitter line for rose beds can ensure consistent moisture without overwatering the surrounding plants—see our guide on how to grow roses from cuttings for optimal care tips. Mulching around the emitters also helps retain moisture and suppress weeds, complementing the drip system and connecting nicely with strategies on how to prevent garden weeds naturally.
Tools You’ll Need
Gather a utility knife or tubing cutter, a hole punch for micro‑tubing, a screwdriver, pliers, and a measuring tape. A small shovel or trowel will be handy for burying tubing shallowly, and a bucket for catching any excess water during testing. Having these tools on hand streamlines the installation process and keeps you focused on the task at hand.
Step‑by‑Step Installation Guide
1. Preparing the Water Source
Start by attaching a backflow preventer to your outdoor faucet, followed by a pressure regulator set to 25‑30 PSI. Connect a filter to catch debris, then attach the main ½‑inch tubing. If you’re using a rain barrel, install a diverter that allows you to switch between municipal water and harvested rainwater.
2. Laying Out the Main Line
Run the main tubing along the garden’s perimeter, securing it with stakes or landscape pins every few feet. Keep the line as straight as possible to minimize pressure loss. For longer runs, consider adding a second pressure regulator to maintain consistent flow across distant zones.
3. Branching Into Zones
Use T‑connectors to branch off into each zone. Attach a separate length of ¼‑inch micro‑tubing to each T‑connector, then run this lateral line to the plants within the zone. If you have a vegetable row, lay the micro‑tubing parallel to the row, spacing emitters 12‑18 inches apart. For shrubs like boxwood, place a single emitter at the base of each plant.
4. Installing Emitters
Choose emitters based on the water needs you calculated earlier. For high‑water‑demand plants (tomatoes, peppers), use 2‑gallon‑per‑hour (GPH) emitters. For low‑water‑need perennials, 0.5‑GPH emitters work well. Insert the emitters into the micro‑tubing using a hole punch, then push them flush against the soil surface. For added protection, cover the emitter with a small mulch ring to keep it from being dislodged.
5. Securing and Testing the System
After all emitters are in place, gently press the micro‑tubing into the soil or cover it with a thin layer of mulch to protect it from UV exposure. Turn on the water slowly, checking each zone for leaks or clogs. Use a flow meter or a simple bucket test (run water for 15 minutes and measure the volume) to verify that each emitter delivers the intended flow rate. Adjust the pressure regulator if necessary.
6. Programming the Timer
Set the timer to water early in the morning or late in the evening to reduce evaporation. For most gardens, 30‑45 minute sessions, two to three times per week, are sufficient, but adjust based on weather conditions and plant growth stages. Smart timers can integrate with weather stations, automatically skipping watering when rain is forecasted.
Maintenance and Troubleshooting
Routine Checks
Inspect your system every few weeks, especially after the first frost or heavy rain. Look for clogged emitters, cracked tubing, or loose connections. Flush the system at the start of each growing season by running water through the main line for several minutes to clear any debris that may have accumulated.
Dealing With Clogs
If an emitter stops delivering water, first try cleaning it with a small brush or a needle. Persistent clogs often indicate the need to replace the filter or to use a higher‑grade filter to capture finer particles. In areas with hard water, consider installing a water softener or using a vinegar solution to dissolve mineral buildup.
Seasonal Adjustments
In colder climates, drain the system before the first freeze to prevent tubing from cracking. Store any excess tubing and fittings indoors for next year’s use. For warm climates, you may want to add a shading cloth over exposed emitters to protect them from UV degradation.
Optimizing Performance
Periodically reassess plant water needs as they mature. Young seedlings may require more frequent, lighter watering, while established perennials can tolerate longer intervals. Adjust the timer settings accordingly, and consider adding moisture sensors for precise control. This fine‑tuning can lead to even greater water savings and healthier plants.

Cost‑Saving Tips and Environmental Benefits
While the upfront cost of a drip system varies, it usually pays for itself within a season through reduced water bills. To stretch your budget, repurpose old garden hoses as main lines, or purchase bulk tubing and cut it to size yourself. Using rainwater harvested in barrels can further cut municipal water usage, especially during droughts. Beyond savings, drip irrigation reduces runoff, protecting local waterways from excess nutrients and chemicals—a win for both your garden and the environment.
Common Mistakes to Avoid
1. Over‑pressurizing the system: Too much pressure can cause emitters to spray rather than drip, wasting water. Always use a pressure regulator.
2. Skipping the filter: Debris and sediment can quickly clog emitters, leading to uneven watering.
3. Incorrect emitter placement: Placing emitters too far from plant roots defeats the purpose of targeted watering.
4. Ignoring soil type: Sandy soils drain faster and may require more frequent watering, while clay retains moisture longer. Adjust emitter flow rates accordingly.
5. Forgetting to mulch: Mulch conserves moisture, reduces weed growth, and protects emitters from sunlight—pair it with your drip system for maximum efficiency.
Bringing It All Together
Designing and installing a DIY drip irrigation system may seem daunting at first, but by breaking the process into manageable steps—planning, selecting materials, installing, and maintaining—you’ll soon enjoy a garden that thrives with less effort and lower water usage. Remember to tailor zones to plant needs, use quality components, and perform regular checks to keep the system running smoothly. With the right approach, your garden will not only look lush and vibrant but also become a model of sustainable, water‑wise gardening.
What are the main advantages of drip irrigation over traditional sprinklers?
Drip irrigation delivers water directly to the root zone, reducing evaporation, minimizing runoff, and preventing foliage diseases. It also saves water, cuts utility costs, and allows precise control over watering schedules, which is especially beneficial for diverse garden zones.
How do I determine the correct flow rate for my garden’s emitters?
Calculate the weekly water requirement (about 1‑1.5 inches per week), convert it to gallons per square foot, and then divide by the number of watering sessions you plan. Choose emitters that deliver that amount per hour, adjusting for plant type and soil conditions.
Can I use a rain barrel with a drip irrigation system?
Yes. Install a diverter or a dedicated inlet on the rain barrel, connect it to a backflow preventer, and then feed the drip system. This setup maximizes water savings by using harvested rainwater for your garden.
What maintenance tasks should I perform each season?
At the start of the season, flush the system to clear debris, inspect for leaks, and replace any damaged tubing or emitters. In winter, drain the system to prevent freezing. Periodically check filters, clean clogged emitters, and adjust timer settings as plants mature.
How can I integrate drip irrigation with existing garden features like mulch or raised beds?
Lay the drip tubing just beneath the mulch layer to protect it from UV and keep it hidden. For raised beds, run the main line along the perimeter and use emitters at the base of each plant or in a grid pattern. Mulch helps retain moisture and reduces weed growth, complementing the drip system.
1 réflexion au sujet de « Drip Irrigation System For Garden DIY – Expert Guide and Ideas »